Using Word Macros for Editing
When I first started editing, I heard many people talk about how useful macros were. They sounded complicated to me, and I told myself that I was just fine editing without them. Then I started having wrist pain, and I needed to find ways to reduce the strain on my body. I knew that macros could be mapped to keyboard shortcuts, so I took the plunge and decided to actually take the time to look into what they were all about. I wish I’d done so sooner!
My resistance to using them was unjustified, and now I don’t want to go back to editing (or writing) without them. I thought I’d share what I’ve learned about using macros, including my favorite ones for editing, in case it helps others who are hesitant to try them or unsure of what macros can do. Also, if you’re interested in learning about other tools that can make you more efficient while editing, check out my Efficiency Tools for Editing post.
What are macros?
Macros are programming scripts that allow you to automate tasks. A macro can turn an extremely complex task into the work of a single mouse click or keyboard shortcut.
I have tried only a fraction of the Word macros that exist, all part of Paul Beverley’s Macros for Editors. If you’re new to macros, I recommend downloading his document called “Macros from Square One” from his Word Macro Tools website. This is a basic introduction to macros, including how to load them and assign keyboard shortcuts. Loading them sounded daunting in my head—until I actually followed the instructions and realized it was fairly straightforward. After you go through the steps of loading your first macro, you install all subsequent ones by copying and pasting prewritten code.
Paul’s Macro Menu (PDF), which is also linked in the “Macros from Square One” doc, lists and links to all his amazing macros. I also recommend signing up for Jennifer Yankopolus’s Macro of the Month newsletter so that you get an email each month that highlights a different macro. It’s a nice way to slowly add to your macro toolkit.
Why are macros useful?
As an editor, I want most of my brainpower to go into thinking about what the edit should be, not about what mouse clicks or keystrokes need to be executed to make it happen. Macros are useful because the basic tasks we do in editing are often repetitive, such as deleting words or punctuation marks, fixing word choice errors, or swapping misplaced letters.
Macros can make us more efficient because they reduce the number of steps we have to take to achieve a result. And because they can be assigned to keyboard shortcuts, we don’t have to engage in as many physical motions with our hands and wrists, thereby reducing strain.
They can also make us more accurate. It’s easy to delete a punctuation mark and insert a different one, or to change 23 to twenty-three, but every time we intervene with the text, we risk doing something incorrectly. I may accidentally delete the space next to the punctuation mark instead of the actual punctuation mark, or I may type twenty-tree. Macros that automate these tasks help us reduce the likelihood of a mistake, though it’s still important to double-check that the macro runs correctly and does what we need it to, of course.
My favorite macros
I’ve only skimmed the surface of Paul’s 800+ macros, and I know I have more to try. His aren’t the only ones out there, but they’re the ones I’ve used. Here are my favorite macros to use while editing. I edit fiction, so some of these won’t apply to other types of editing.
ProperNounAlyse creates an alphabetical list of all proper nouns in a document and highlights similar words, such as Britney/Brittney. I run this macro before I start editing a new manuscript so I can compare names and terms to spot any potential discrepancies from the get-go.
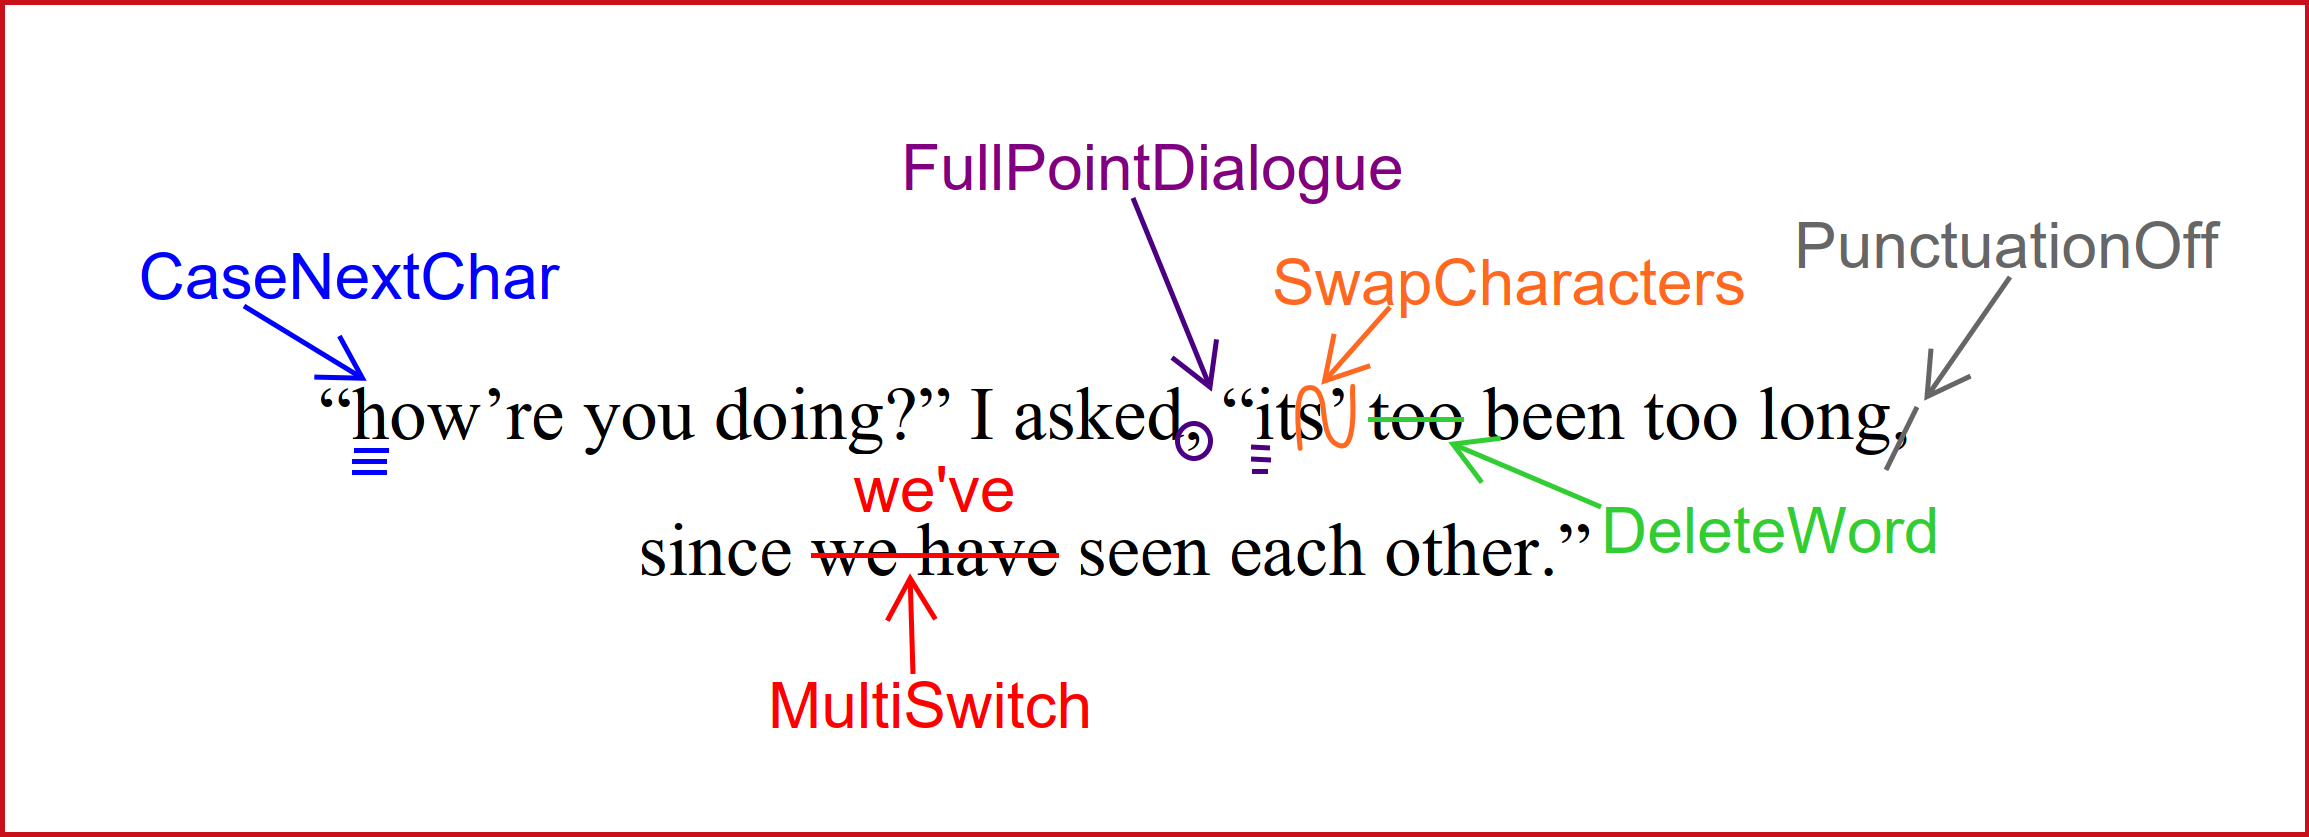
CaseNextChar changes the next character to the opposite case, depending on what it is already. A lowercase letter becomes capitalized and vice versa. This was super handy when I was drafting my Conscious Language Toolkit for Editors. Originally, I had written all resource names in headline style, meaning I capitalized all the important words in the name. I later decided to change to sentence style, with only the first word and proper nouns capitalized. Instead of having to delete the capital letters and retype them as lowercase, I was able to hit my keyboard shortcut for CaseNextChar for each word I needed to change. This cut my keystrokes in half and saved me from having to think about the letters themselves.
DeleteWord deletes a single word, whether the cursor is at the beginning, middle, or end of it. I use this one ALL the time because it means I can delete a word or phrase in a single keystroke without having to highlight it or having to hit either Backspace or Delete repeatedly.
DeleteRestOfSentence deletes the rest of a sentence after the cursor. It’s incredibly useful for fiction editors because it turns a piece of dialogue like “I don’t want to,” she said. to “I don’t want to.” if you put the cursor in “to” and use the macro, meaning it changes the comma to a period automatically!
PunctuationOff removes the next punctuation mark. I love being able to spot an upcoming comma and hit a single key to delete it without having to actually select the comma.
Comma places a comma between words and lowercases the following word.
CommaInDialogue turns a punctuation mark in dialogue into a comma and lowercases the next word.
FullPoint places a period between words and capitalizes the next word.
FullPointInDialogue turns a punctuation mark in dialogue into a period and capitalizes the next word. This is especially helpful for turning all those smiles and shrugs that accidentally get used as dialogue tags into action beats.
SwapCharacters inverts the position of two characters, including punctuation marks. This is handy for turning ya’ll into y’all or discrete into discreet.
SwapWords inverts the position of two words. With a single keystroke, I can make I only had one into I had only one.
MerriamFetch searches Merriam-Webster’s online dictionary for the word your cursor is on, or you can highlight a phrase and execute the macro. With how much I look up words, this one saves me from having to either copy and paste the word or retyping the word in M-W’s search box.
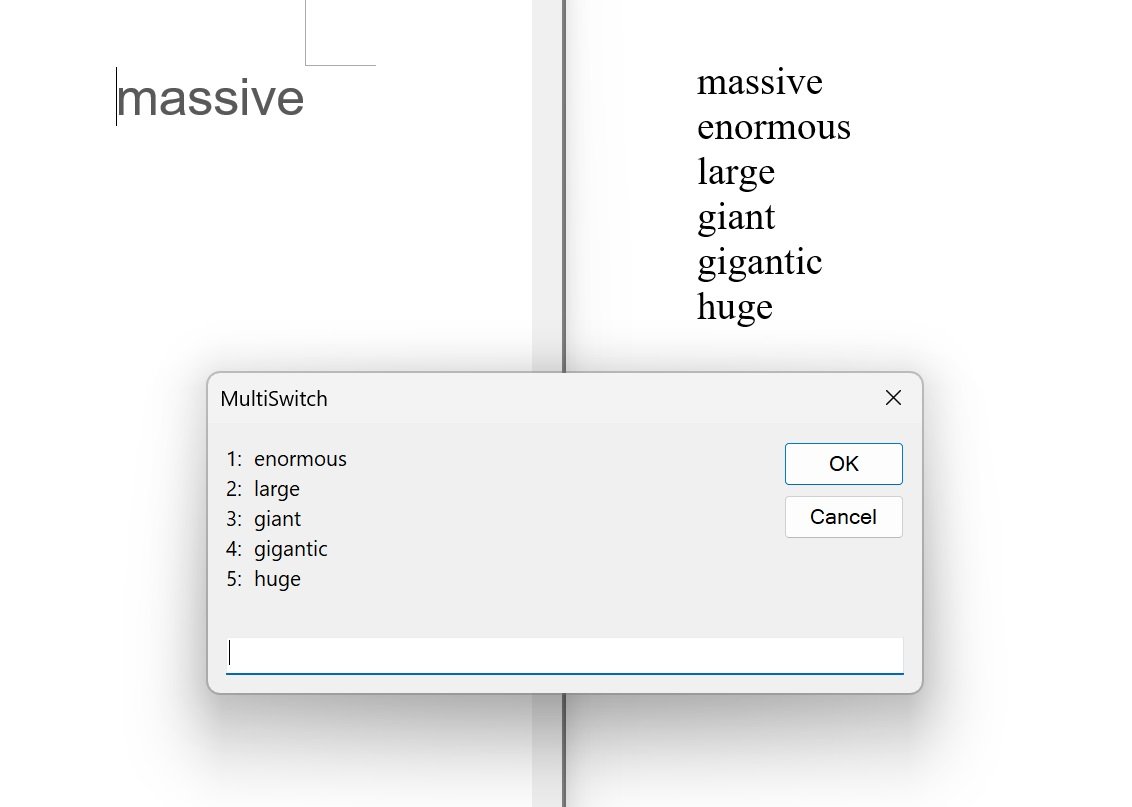
MultiSwitch swaps one word for another from a list that you designate in a separate file. It’s nice for changing words you edit all the time, like contractions or common confusables. I can quickly turn cannot into can’t, that into which, and utilize into use with a single keystroke. Not only that, but I can create a short list of multiple alternatives to choose from for a specific word or phrase, not just one. For example, I do a lot of line editing for an author who often uses the word massive to describe anything large, so sometimes I mix things up a bit to help the writing from getting repetitive. Therefore, in my MultiSwitch list, I have a list of alternatives that are synonyms for massive that I can choose from, not just one. By simply hitting my MultiSwitch shortcut key (F12), I get a menu that pops up with the list of alternatives I’ve preset. I can then type in the number that corresponds to the word’s position in the list, hit Enter, and replace massive with the word I want. So hitting F12, 4, and Enter results in replacing massive with gigantic. That’s three keystrokes instead of selecting massive, deleting it, and typing gigantic.
Paul Beverley offers a prepopulated list in his Macro Starter Pack (the file is called “zzSwitchList”), and Louise Harnby also has a downloadable list of contractions in her in-depth tutorial on using MultiSwitch.
All of these macros can be found in Paul’s free macro book. I encourage you to look through his list of macros and try out ones that sound interesting or useful.
Macros in practice
It can be difficult to grasp how useful macros are without seeing them in action, so here’s an example of a sentence I might need to edit (including a short video walkthrough of what the macros look like in action). The first image is the original version of the sentence, and the second is what I want the text to be. The third image shows what macros I can use to make these changes. None of these macros involve me typing anything—only using the mouse and hitting a keyboard shortcut.
Original text
Desired text
Macros for edits
A video walkthrough
If I were to manually make all the edits desired, it would take me 16 keystrokes. If I were to use the macros, it would take me 6. (All of these macros are mapped to my Function keys, so each one is only one button press rather than a combination like Ctrl+Alt+something.) This may not sound like a big difference, but if you consider that this 16-word example could be in a manuscript that’s 80,000 words, those saved keystrokes add up quickly.
Final thoughts
If you haven’t explored macros before, I recommend giving them a try. There was a learning curve for me, but once I tried them and got used to them, I realized how helpful they were. I definitely won’t be going back to editing without them! For those of you who already use macros, which ones do you love?


